Migrate SP list from SP 2010 to SP 2013 without using any tool
Hi guys,
You might asked to migrate SP list from SP 2010 to SP 2013 environment. This question might be asked that why II now didn't talk about migration of whole site/site collection. Answer is, as there are number of ways one can adopt for migration of whole environment like:
1) Database attache detach(best in case of 2010>2013)
2) Third party tool(best in case of 2007>2013)
But in case of second option you might not face this challenge but when doing database detach attach process there are chances that user continued updating old portal and then after some time client released that they need to re-migrate the list to new server again.
Any ways don't know real world cases but I got this requirement from client that they want to move four lists from one sub site of old server to new sub site of new server. So I am explaining the way I performed re-migration of list to new server.
The solution is quite simple but some tricks to achieve what we want. Find the following steps:
1) Export Old list:
There are various ways to get the backup of list with content either using PowerShell or directly from Central admin. Choice depends on user depends on his/her ease. If choice is Central admin then follow the given steps:
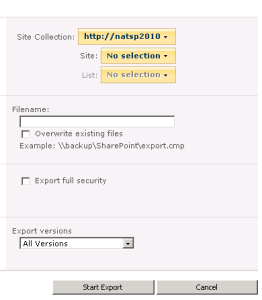
a) Navigate to SP 2010 server and open central admin
b) Backup and Restore > Export a site or list.
c) Choose your list, and click Start Export.
If you are PowerShell expert then try using this command:
Export-SPWeb -Identity <SiteURL> -Path <Path and File Name> [-ItemUrl <URL of Site, List, or Library>] [-IncludeUserSecurity] [-IncludeVersions] [-NoFileCompression] [-GradualDelete] [-Verbose]
2) Update the backup files:
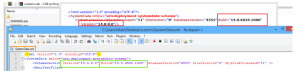
Now this step is quite important as we are not going to change the backup files in order to make compatible for Version 2015 . It is expected that till this point you must be having exported list in to format .cmp file. Copy the this to any convenient location and change the extension to .cab. Extraction can be done by using a software like WinRar or 7zip.
Now, open the SystemData.XML file with an editor like NotePad++ and change the version from 14.0.0.0 to 15.0.0.0 , and the build version from your 14.0.x.x to 15.0.x.x.
3) Package the files again:
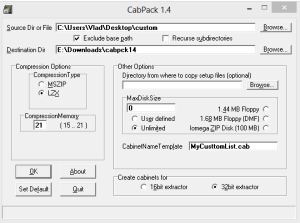
Backup file is converted in to cab format which can not be used for import the list. There is a freeware available which can be used to create .cab file. Name of that tool is CabPack. Download and install this tool and select your Source and Destination. Change the CabinetNameTemplate if you want, and click on OK.
Now file extensions have to be changed to .cmp. Simply rename the .cab file created by tool and change the extension from .cab to .cmp.
4) Import the list
Last and final step is to import the file to SP 2013 server and get the list created at new location by just executing one PowerShell command. So start by copying the .cmp file back on the network share or directly on the SharePoint 2013 Server.
Open SharePoint 2013 Management Shell as an administrator. Run this command by changing the parameters of course!
"Import-SPWeb -Identity http://sp2013/ -Path c:\\MyCustomList.cmp -Verbose"

That All!!
Now open the site contents and check if SP2010 list has been migrated perfectly or not.
Thanks for your time. Happy SharePointing :)
You might asked to migrate SP list from SP 2010 to SP 2013 environment. This question might be asked that why II now didn't talk about migration of whole site/site collection. Answer is, as there are number of ways one can adopt for migration of whole environment like:
1) Database attache detach(best in case of 2010>2013)
2) Third party tool(best in case of 2007>2013)
But in case of second option you might not face this challenge but when doing database detach attach process there are chances that user continued updating old portal and then after some time client released that they need to re-migrate the list to new server again.
Any ways don't know real world cases but I got this requirement from client that they want to move four lists from one sub site of old server to new sub site of new server. So I am explaining the way I performed re-migration of list to new server.
The solution is quite simple but some tricks to achieve what we want. Find the following steps:
1) Export Old list:
There are various ways to get the backup of list with content either using PowerShell or directly from Central admin. Choice depends on user depends on his/her ease. If choice is Central admin then follow the given steps:
a) Navigate to SP 2010 server and open central admin
b) Backup and Restore > Export a site or list.
c) Choose your list, and click Start Export.

If you are PowerShell expert then try using this command:
Export-SPWeb -Identity <SiteURL> -Path <Path and File Name> [-ItemUrl <URL of Site, List, or Library>] [-IncludeUserSecurity] [-IncludeVersions] [-NoFileCompression] [-GradualDelete] [-Verbose]
2) Update the backup files:
Now this step is quite important as we are not going to change the backup files in order to make compatible for Version 2015 . It is expected that till this point you must be having exported list in to format .cmp file. Copy the this to any convenient location and change the extension to .cab. Extraction can be done by using a software like WinRar or 7zip.
Now, open the SystemData.XML file with an editor like NotePad++ and change the version from 14.0.0.0 to 15.0.0.0 , and the build version from your 14.0.x.x to 15.0.x.x.

3) Package the files again:
Backup file is converted in to cab format which can not be used for import the list. There is a freeware available which can be used to create .cab file. Name of that tool is CabPack. Download and install this tool and select your Source and Destination. Change the CabinetNameTemplate if you want, and click on OK.

Now file extensions have to be changed to .cmp. Simply rename the .cab file created by tool and change the extension from .cab to .cmp.
4) Import the list
Last and final step is to import the file to SP 2013 server and get the list created at new location by just executing one PowerShell command. So start by copying the .cmp file back on the network share or directly on the SharePoint 2013 Server.
Open SharePoint 2013 Management Shell as an administrator. Run this command by changing the parameters of course!
"Import-SPWeb -Identity http://sp2013/ -Path c:\\MyCustomList.cmp -Verbose"

That All!!
Now open the site contents and check if SP2010 list has been migrated perfectly or not.
Thanks for your time. Happy SharePointing :)

Comments
Post a Comment