SQL Server install error Wait on the Database Engine Recovery Handle Failed
Hi Guys,
Last week during the installation of SQL Server standalone instance, I have faced an issue. After installing all the prerequisites and I started installing SQL Server. Though, I did not get any warnings or errors in any of the rules or steps during the SQL Server installation wizard, but I got the below error at the end of the installation:
This issue is giving misleading message. Well, I could not able to understand the cause of this error. I followed standard installation guide and completed pre-check before proceeding installation of SQL Server, but I still got this issue. In this blog, I will explain how did I resolved this issue.
After many rounds of troubleshooting I decided to do some research on the web. This was the first time I got this issue, so I had no clue about how to fix except for reading and analyzing the error log files. Interestingly, I found multiple solutions to fix this issue over the internet. Below are three options which can be used to fix this issue. I will explain the first in this tip and the remaining in future tips.
This error comes about because the account which the user selected on the Server Configuration page during installation is somehow not able to bring the SQL Server database engine services online. Either it lacks privileges or it is corrupted. During installation of the database engine services, SQL Server tries to bring online the database services as an internal process, but due to the startup account either being corrupt or not having the appropriate privileges it fails to do so and ultimately the installation fails. There might be a possibility that someone had tried to install SQL Server previously on this machine, but failed to do so and they did not clean the machine properly during the uninstallation.

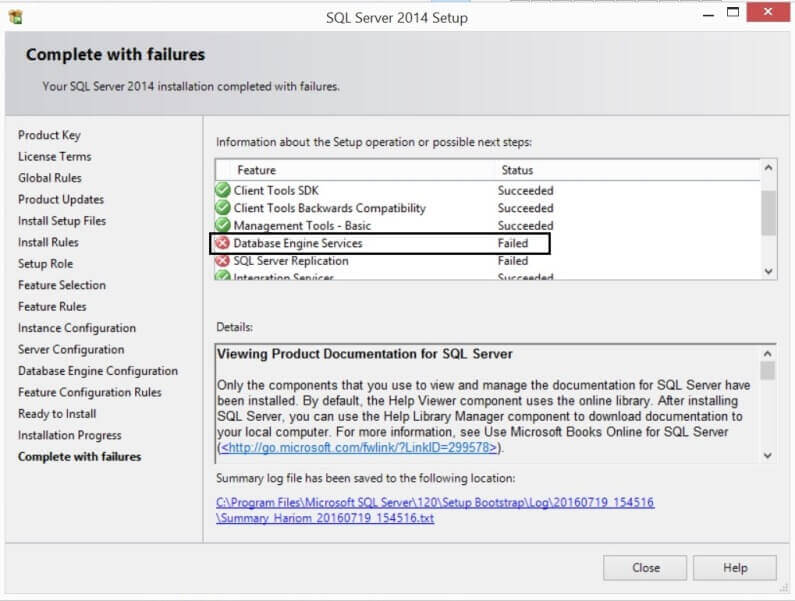
When you click on OK button after reading and analyzing the error, the below screen will appear confirming that a few of the features failed to install.
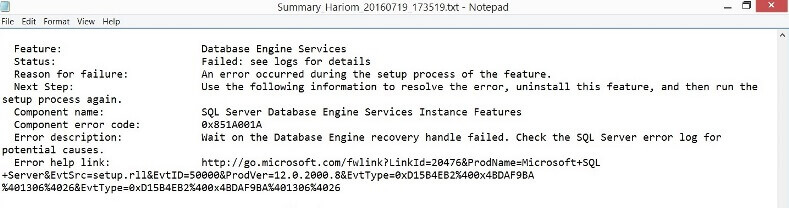
I decided to review the error log file to find out more about this error, but I did not get much from the error log file as shown in the below screen shot.
To move forward, I will uninstall this SQL Server instance and then reinstall it again with some minor changes. Let's go ahead and uninstall it using the "Add/Remove Program" feature in Windows. If you are not able to remove SQL Server instance then you will need to do a manual uninstallation to clean the machine. Make sure to remove all SQL Server related files from the system as well as the registry. Before removing anything from the registry create a backup of the registry first. I uninstalled this instance successfully and proceeded with the next step.
Restart your machine after successful removal of the SQL Server instance. Now go ahead and launch the SQL Server setup again to start the SQL Server installation.
Fill all the required details and click on Next buttons to proceed until the "Server Configuration" page. You can see below that the SQL Server database engine and SQL Server Agent service account is configured to run with NT AUTHORITY/NETWORK SERVICE and NT AUTHORITY/NETWORK SERVICE. Our last installation failed due to this, so here I will change these service accounts to use the local System account to run the installation.
Note: The "Network Service" is a built-in local account used by the service control manager.This account is not recognized by the security subsystem, hence you cannot specify its name in a call to the Lookup for Account Name.
To lookup "Network Service" account name, in location select "local machine" instead of Entire Directory.
We can change both service accounts to local System. On the SQL Server Database Engine and Agent service, click the drop down option to select user NT Authority\NETWORK SERVICE which is also known as the local system account.
Now click on the Next button and proceed with the installation by filling in the required details and clicking on the Next buttons until the end of the setup. Installation should now proceed and finish with a green status for all features as you can see in the below screenshot.

Now you can check the SQL Server services to make sure they are running. You can also connect to the database instance and run some queries to check that things are working properly.
Hope this help you.
Thanks
Last week during the installation of SQL Server standalone instance, I have faced an issue. After installing all the prerequisites and I started installing SQL Server. Though, I did not get any warnings or errors in any of the rules or steps during the SQL Server installation wizard, but I got the below error at the end of the installation:
The following error has occurred:
Wait on the Database Engine recovery handle failed. Check the SQL Server error log for potential causes.
This issue is giving misleading message. Well, I could not able to understand the cause of this error. I followed standard installation guide and completed pre-check before proceeding installation of SQL Server, but I still got this issue. In this blog, I will explain how did I resolved this issue.
After many rounds of troubleshooting I decided to do some research on the web. This was the first time I got this issue, so I had no clue about how to fix except for reading and analyzing the error log files. Interestingly, I found multiple solutions to fix this issue over the internet. Below are three options which can be used to fix this issue. I will explain the first in this tip and the remaining in future tips.
- Fix it by uninstalling SQL Server and then reinstalling
- Fix issue by using sa account
- Fix using by creating a login post installation and connecting to the instance in single user mode
This error comes about because the account which the user selected on the Server Configuration page during installation is somehow not able to bring the SQL Server database engine services online. Either it lacks privileges or it is corrupted. During installation of the database engine services, SQL Server tries to bring online the database services as an internal process, but due to the startup account either being corrupt or not having the appropriate privileges it fails to do so and ultimately the installation fails. There might be a possibility that someone had tried to install SQL Server previously on this machine, but failed to do so and they did not clean the machine properly during the uninstallation.
When you click on OK button after reading and analyzing the error, the below screen will appear confirming that a few of the features failed to install.
I decided to review the error log file to find out more about this error, but I did not get much from the error log file as shown in the below screen shot.
To move forward, I will uninstall this SQL Server instance and then reinstall it again with some minor changes. Let's go ahead and uninstall it using the "Add/Remove Program" feature in Windows. If you are not able to remove SQL Server instance then you will need to do a manual uninstallation to clean the machine. Make sure to remove all SQL Server related files from the system as well as the registry. Before removing anything from the registry create a backup of the registry first. I uninstalled this instance successfully and proceeded with the next step.
Restart your machine after successful removal of the SQL Server instance. Now go ahead and launch the SQL Server setup again to start the SQL Server installation.
Fill all the required details and click on Next buttons to proceed until the "Server Configuration" page. You can see below that the SQL Server database engine and SQL Server Agent service account is configured to run with NT AUTHORITY/NETWORK SERVICE and NT AUTHORITY/NETWORK SERVICE. Our last installation failed due to this, so here I will change these service accounts to use the local System account to run the installation.
Note: The "Network Service" is a built-in local account used by the service control manager.This account is not recognized by the security subsystem, hence you cannot specify its name in a call to the Lookup for Account Name.
To lookup "Network Service" account name, in location select "local machine" instead of Entire Directory.
We can change both service accounts to local System. On the SQL Server Database Engine and Agent service, click the drop down option to select user NT Authority\NETWORK SERVICE which is also known as the local system account.
Now click on the Next button and proceed with the installation by filling in the required details and clicking on the Next buttons until the end of the setup. Installation should now proceed and finish with a green status for all features as you can see in the below screenshot.
Now you can check the SQL Server services to make sure they are running. You can also connect to the database instance and run some queries to check that things are working properly.
Hope this help you.
Thanks

Comments
Post a Comment